Full Unity 2D Game Tutorial 2019 – Particle Effects CPU and GPU
Particle effects are a special type of technique used to display many objects/sprites in an efficient manner to create various effects. The particle system was developed to be a more efficient way of rendering multiple images quickly to create effects that the normal rendering methods would not be able to do without a huge drain on computational power. Particle effects by default are run in the CPU and not in the GPU(as I had thought) however Unity now has the ability to use the GPU with particle effects which we will look into later.
Full Unity 2D Game Tutorial 2019 – Particle Effects System
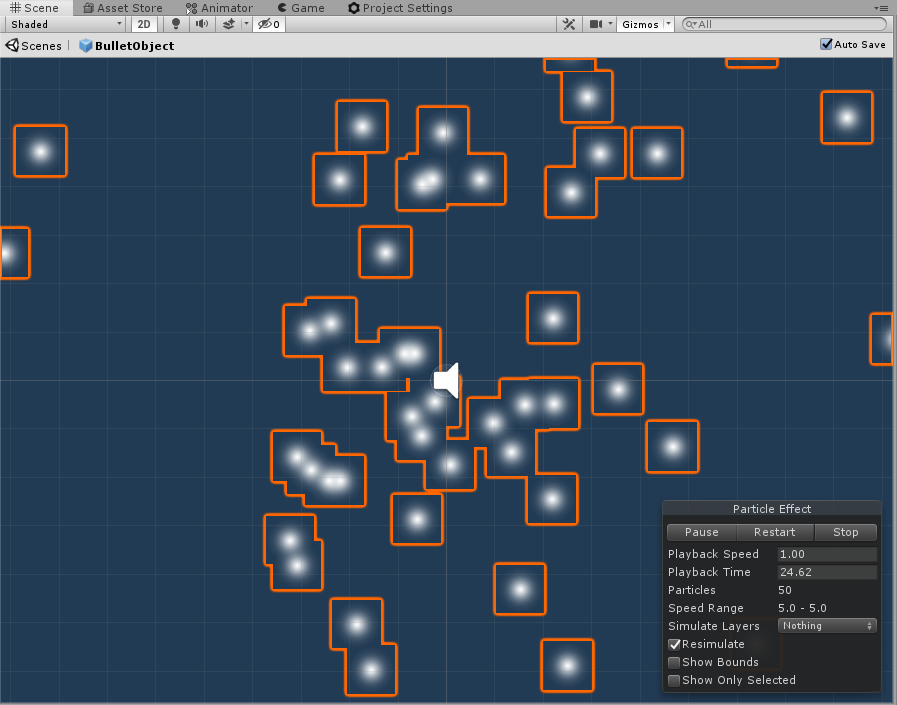
In order to use particle effects you must first add a particle effect system. We will be adding one to our bullets so each of our bullets can emit a cool effect when it is travelling through space. Open up the bullet prefab by double clicking it in the project window. With the root object selected(BulletObject) right click and add effect > particle system. As soon as you add the particle system you should see the effect play in the scene view.
Full Unity 2D Game Tutorial 2019 – Particle Effects What does this button do?
 Before we start I will give you a quick overview of the different options (later I will have full tutorial on Particle effects which I will link to here).
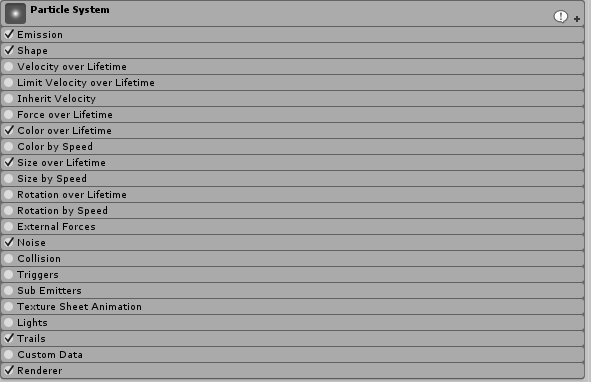
- Particle System
- This is the global options for the particle effect, we can set things like looping, initial size, pre-warm etc.
- Emission
- This is used to define how the particle pop into existence. All at once or slow trickle.
- Shape
- Where the particle spawn from. Come out from a circle, spawn in a circle etc.
- Velocity over Lifetime
- Speed and direction to go after spawning. Great for emulating wind or smoke rising.
- Limit Velocity Over Lifetime
- Used to slow down particles as they get older.
- Inherit Velocity
- Should the particle get its velocity from the parent its attached to.
- Force Over Lifetime
- Similar to velocity over Lifetime except this uses a force so speed will increase over time.
- Color Over Lifetime
- Change the particle color as it gets older. Can assign a gradient from white to transparent so particle look like they fad out of existence.
- Color by Speed
- Sets the color of the particle based on its speed.
- Size over Lifetime
- Change the size of the particle as it gets older. Small to Big, Big to Small or assign a custom curve.
- Size by Speed
- Change the size based on the speed.
- Rotation over Lifetime
- Rotates the particle over its life by x degrees. works best with custom particle as the default is round.
- Rotation by Speed
- Rotates a particle based on its speed.
- External Forces
- Allows the particle to be affected by forces defined by you (wind zones etc).
- Noise
- Changes the particle based on a noise algorithm like perlin or simplex.
- Collision
- Allows particle to collide with colliders.
- Triggers
- Allows interaction and callbacks when entering trigger colliders.
- Sub Emitters
- Can initiate another particle effect.
- Texture Sheet Animation
- Allows you to use an animation instead of a static image for a particle.
- Lights
- Allow particle to emit light to nearby objects.
- Trails
- Make particle leave a trail behind them.
- Custom Data
- Allows you to get information on the particle in a script.
- Renderer
- Here you can set how the particle is rendered to the user.
Full Unity 2D Game Tutorial 2019 – Particle Effects Our Bullet Effect
For our Bullet we will use the Emission, Shape, Color over Lifetime, Size over Lifetime, Trails and Renderer. Below are the settings I have used Which you can copy, or if you want to try and make something cooler have a play around and see what you come up with.


If you used my settings you should come out with something like the following gif.

Full Unity 2D Game Tutorial 2019 – Particle Effects GPU
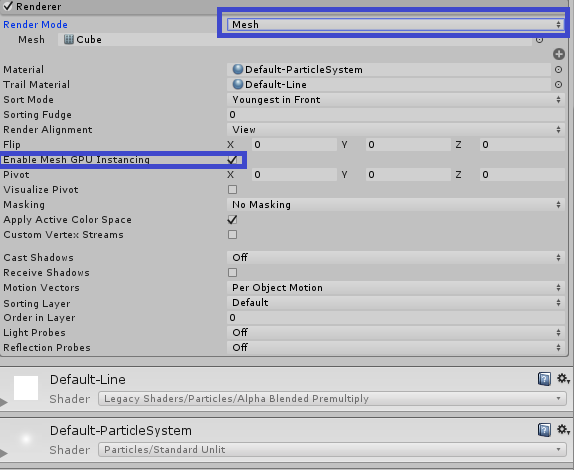
To use the GPU to compute our particle we must first change the render method from Billboard to mesh. Then make sure the Enable Mesh GPU Instancing is checked. This will allow the GPU to work on the particles but may cause issues when working on platforms like web pages. So only use this if you know it’s supported on the platform you will use.
That’s it for this section of the tutorial. As usual the completed source is available on Github here.
Previous Part – Next Part (coming soon)
The post Full Unity 2D Game Tutorial 2019 – Particle Effects CPU and GPU appeared first on Game Development.


